

Follow the steps provided here to install the Data Broker Consolidated Buttons here.
Follow the step-by-step guide below to incorporate Deals into your Elements.
1. Add values to the Object picklist field for Time/Expense Rollup Trigger custom object (Mandatory)
a.Click on the gear icon at the top-right corner of Elements home page and select ‘Setup'.

b.Click on Object Manager tab.

c. In the Quick Find search bar on the right side of the screen, type the keyword as Time/Expense Rollup and click on the Time/Expense Rollup Trigger object under the Label column.

d. Click on the Fields & Relationships menu item on the left side of the screen which will display all the Time/Expense Rollup Trigger fields.

e. Type Object in the Quick find search bar and click on the Object picklist field to open the field details screen.

f. Scroll down to the section named as Values and verify if the following values are present -
Investments
Investment Opportunity.

g. If the aforementioned values are not present, then click on the New button.

h. Type the following values in the text box and click on Save
Investments
Investment Opportunity.

i. Scroll down again to the Values section and verify the new values were added to the picklist values.

2. Assign the Salentica Elements Deals permission set to specific users (Mandatory)
a. Click on the gear icon at the top-right corner of Elements home page and select ‘Setup'.

b. Click on Home tab

c. In the Quick Find search bar on the left side of the screen, type the keyword as Users and click on the Users option under the Users column

d. Click on the specific user name who needs access to the Elements Deals app under the Full Name column.

e. Scroll down to the Permissions Set Assignments section and click on the Edit Assignments button.

f. Select Salentica Elements Deals from the Available Permissions Sets menu and click on the Add button to move it under the Enabled Permission Sets menu. Then, click on the Save button.

3. Add values to the Object picklist field for Entity Reference custom object (Mandatory)
a. Click on the gear icon at the top-right corner of Elements home page and select ‘Setup'.

b. Click on Object Manager tab.

c. In the Quick Find search bar on the right side of the screen, type the keyword as Time/Expense Rollup and click on the Entity Reference object under the Label column.

d. Click on the Fields & Relationships menu item on the left side of the screen which will display all the Entity Reference fields.

e. Type as Object in the Quick find search bar and click on the Object picklist field to open the field details screen.

f. Scroll down to the section named as Values and verify if the following values are present -
Investments
Investment Opportunity.

g. If the aforementioned values are not present, then click on the New button.

h. Type the following values in the text box and click on Save
Investments
Investment Opportunity.

i. Scroll down again to the Values section and verify the new values were added to the picklist values.

4. Include Elements Deals widget in the app launcher window (Optional)
a. Click on the App Launcher button situated on the top left side of the screen and then click the View All button present at the bottom of the app launcher window.

b. Scroll down till the Elements Deals widget is visible and while holding the left mouse button down, drag it either to the top first or second row.

c. Click on the App Launcher button again on the top left corner to ensure that the Elements Deals app widget is visible.

5. Add values to the picklist field for Due Diligence custom object (Mandatory)
a.Click on the gear icon at the top-right corner of Elements home page and select ‘Setup'.

b. Click on Object Manager tab.

c. In the Quick Find search bar on the right side of the screen, type the keyword as Due Diligence and click on the Due Diligence object under the Label column.

d. Click on the Fields & Relationships menu item on the left side of the screen which will display all the Due Diligence fields.

e. Type as Due Diligence Type in the Quick find search bar and click on the Object picklist field to open the field details screen.

f. Scroll down to the section named as Values and verify if the following values are present -
Investments
Investment Opportunity.

g. If the aforementioned values are not present, then click on the New button.

h. Type the following values in the text box and click on Save
Investments
Investment Opportunity.

i. Scroll down again to the Values section and verify the new values were added to the picklist values.

6. Page Layout additions to Time/Expense custom object (Mandatory)
a.Click on the gear icon at the top-right corner of Elements home page and select ‘Setup'.

b. Click on Object Manager tab.

c. In the Quick Find search bar on the right side of the screen, type the keyword as Time/Expense and click on the Time/Expense object under the Label column.

d. Click on the Page Layouts menu item on the left side of the screen which will display the Time/Expense page layouts.

e. Click on the Time/Expense page layout select the Fields option on the left side of the menu options window.

f. From the menu window on the top, type the following field names one after the other in the Quick Find search bar, then drag and drop them in the Related Object section. Then, click on the Save button
-
Investments
-
Investment Opportunity.

7. Page Layout additions to Contact object (Mandatory)
a. Click on the gear icon at the top-right corner of Elements home page and select ‘Setup'.

b. Click on Object Manager tab.

c. In the Quick Find search bar on the right side of the screen, type the keyword as Contact and click on the Contact object under the Label column.

d. Click on the Page Layouts menu item on the left side of the screen which will display the Contact page layouts.

e. Click on Contact Layout - Summer 19 and select the Fields option on the left side of the menu options window.

f. From the menu window on the top, type the field name as Investment Pipeline in the Quick Find search bar, then drag and drop them in the Contact Information section. Then, click on the Save button.

g. Repeat all the aforementioned steps (from a - f) for all Contact page layouts.

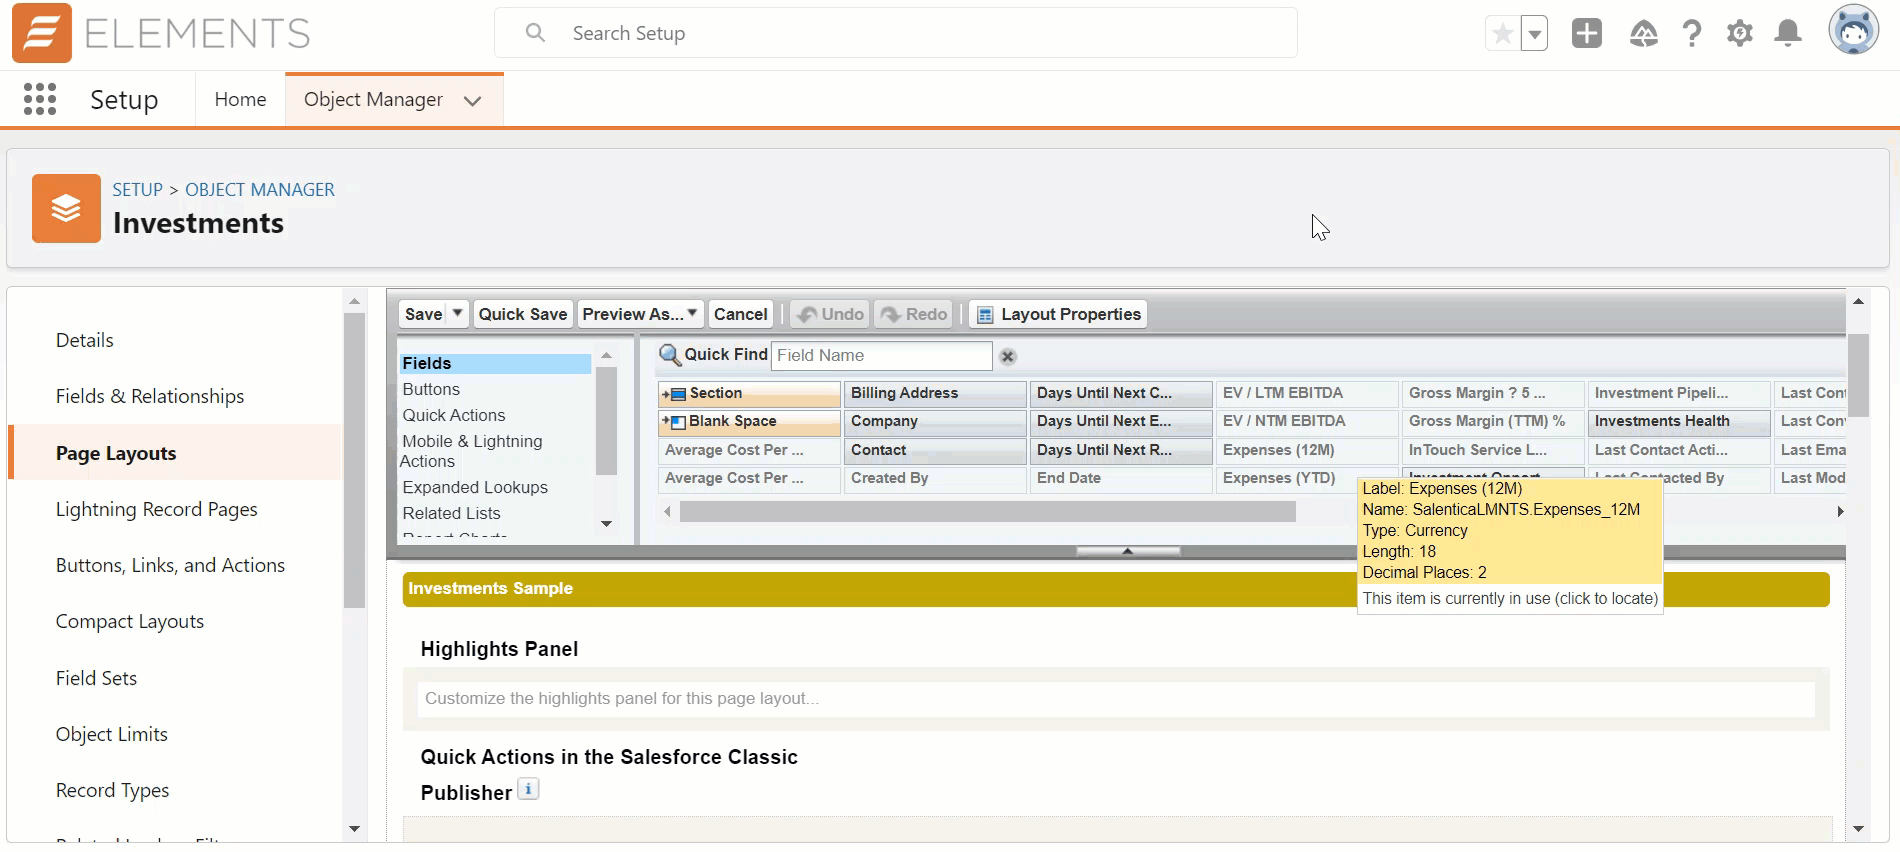
8. Page Layout additions to Investments object (Mandatory)
a. Click on the gear icon at the top-right corner of Elements home page and select ‘Setup.'

b. Click on Object Manager tab.

c. In the Quick Find search bar on the right side of the screen, type the keyword as Investments and click on the Outreach object under the Label column.

d. Click on the Page Layouts menu item on the left side of the screen which will display the Investments page layouts.

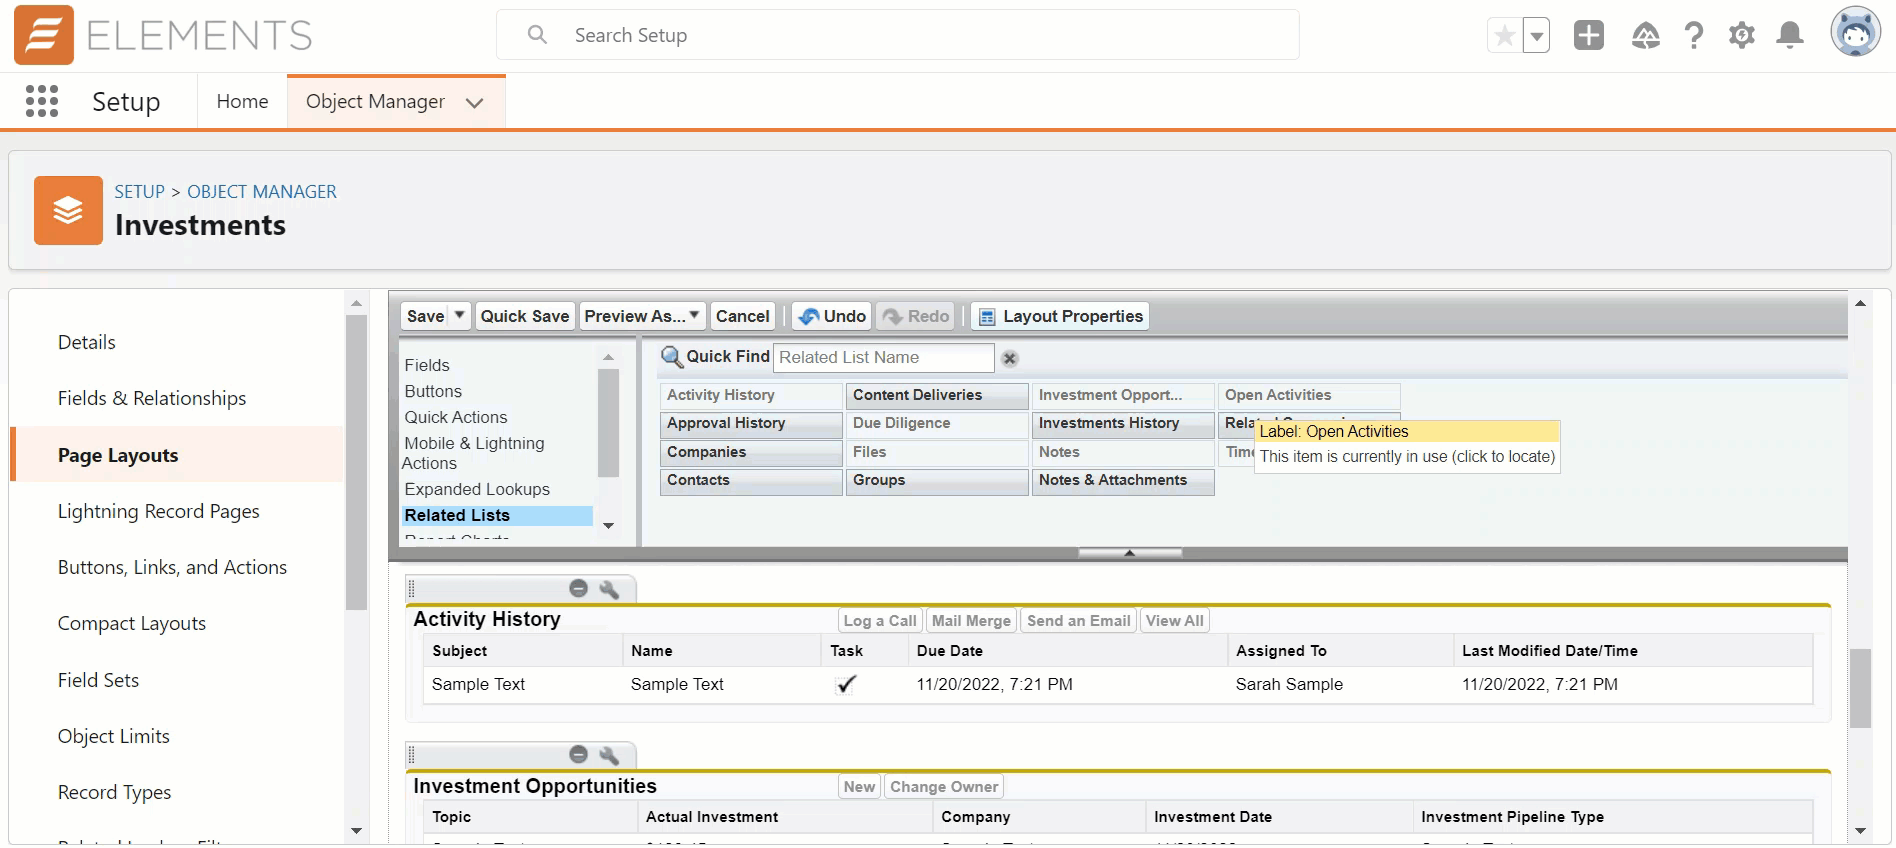
e. Click on Investments Layout and select the Related Lists option on the left side of the menu options window.

f. Drag and drop the following Related Lists to the page layout
i. “Investment Opportunities”
1. Click on the small wrench icon on top of the related list header and add the following fields-
-
Topic
-
Actual Investments
-
Company
-
Investment Date
-
Investment Pipeline Type
ii.
“Contacts”
-
Click on the small wrench icon on top of the related list header and add the following fields-
-
Name
-
Account Name
-
Contact Type
-
Home Phone
-
Mobile
-
Phone
-
Primary Email
-
Mailing City
-
Mailing State/Province
-
iii. “Companies”
-
Click on the small wrench icon on top of the related list header and add the following fields-
-
Company Name
-
Main Phone
-
Investment Pipeline
-
Company Type
-
Total Market Value
-

iv. “Related Companies”
-
Click on the small wrench icon on top of the related list header and add the following fields-
-
Company: Company Name
-
Company: Company Type
-
Company: Main Phone
-
Company: Active Legal Proceedings
-
Company: Owner Name
-
Company: Created Date
-
-
Remove the field “Investments/Companies: Investments/Company” from the Selected Fields column
-
Click on the Save button at the top left corner and click on Yes in the popup window.

9. Page Layout additions to Companies object (Mandatory)
a. Click on the gear icon at the top-right corner of Elements home page and select ‘Setup.'
b. Click on Object Manager tab.
c. In the Quick Find search bar on the right side of the screen, type the keyword as Company and click on the Outreach object under the Label column.

d. Click on the Page Layouts menu item on the left side of the screen which will display the Company page layouts.

e. Click on Company Layout - Summer 19 and select the Related Lists option on the left side of the menu options window

f. Drag and drop the following Related Lists to the page layout.
Drag and drop the following Related Lists to the page layout
-
“Investments”
-
Name
-
Created Date
-
Investments Pipeline Type
-
NDA
-
Start Date
-

ii.
-
“Related Investments”
-
Investments: Name
-
Investments: Created Date
-
Investments: Type
-
Investments: NDA
-
Investments: NDA Expiration Date
-
Investments: NTM EBITDA
-
Investments: NTM Revenue
-
iii. Remove the field “Investments/Companies: Investments/Company” from the Selected Fields column
iv. Click on the Save button at the top left corner and click on Yes in the popup window.

g. Repeat all the aforementioned step f for all Company page layouts.

10. Page Layout additions to Outreach custom object (Mandatory)
a. Click on the gear icon at the top-right corner of Elements home page and select ‘Setup'.
b. Click on Object Manager tab.
c. In the Quick Find search bar on the right side of the screen, type the keyword as Outreach and click on the Outreach object under the Label column.

d. Click on the Page Layouts menu item on the left side of the screen which will display the Contact page layouts.

e. Click on Marketing Campaign Layout and select the Fields option on the left side of the menu options window.

f. From the menu window on the top, type the following field names one after the other in the Quick Find search bar, then drag and drop them in the Information section. Then, click on the Save button
-
Investments Pipeline
-
Investment Pipeline Type

g. Repeat all the aforementioned steps (from a - f) for all Outreach page layouts.

11. Enable Reports for Company object (Mandatory)
a. Click on Object Manager tab.

b. In the Quick Find search bar on the right side of the screen, type the keyword as Company and click on the Outreach object under the Label column.
c. Click on the Edit button at the top right corner of the object Details page.

d. Scroll down to the section named as Optional Features section and click on the Allow Reports option.

e. Scroll down and click the Save button.

12.
Change the dashboard viewer for Elements Deals (Recommended)
(Note - The user should either be a System Administrator or have the following permissions assigned to their respective profiles to complete this step - Create and Customize Dashboards, Edit My Dashboards, Manage Dashboards in Public Folders, View Dashboards in Public Folders).
a. Click on the App Launcher button situated at the top left corner and click on the Elements Deals app widget.

b. From the Home page of the Elements Deals app, click on the Open button present at the right corner of the static dashboard component.

c. Click on the Edit button.

d. Click on the Gear icon present at the top right corner to edit the dashboard properties.

e. From the popup window, scroll down to the “View Dashboard As” section and select any required option. (Note - There is a limit of 5 dynamic dashboards per ORG by Salesforce. So be mindful of this limit before selecting the viewing option as ‘The dashboard viewer’).

f. After completing the dashboard viewer selection, click on the Save button.

g. Click on the Save button again present at the top right corner.

h. After the changes has been saved, click Done button.

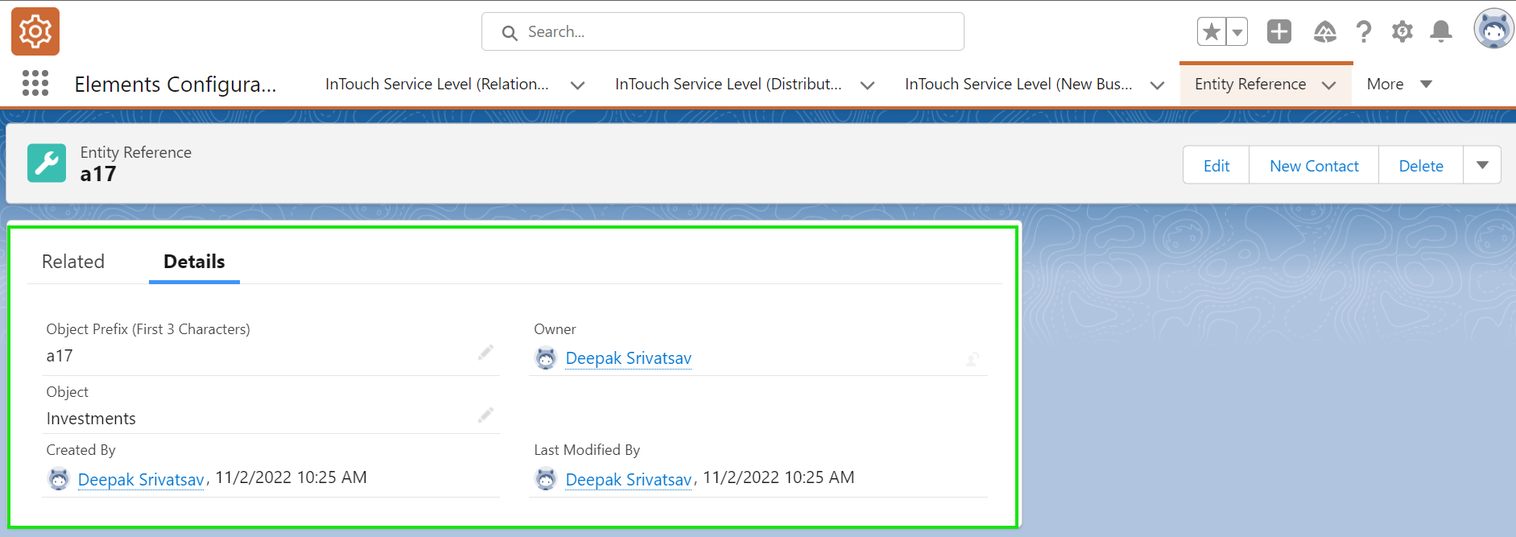
13. Add Entity Reference records for Investments and Investment Opportunity (Recommended)
(Note - User must be a System Admin or have the Salentica Elements Deals permission set assigned to their user account.)
a. Add Entity Reference for Investments
i. Click on the gear icon at the top-right corner of Elements home page and click on Elements Deals widget.

ii. Click on the Investments tab and click any record from the list view.

iii. Copy the first 3 characters of the record ID from the record page URL present in the address bar
Here is an Investments record ID in the Salesforce URL: a17
(Note: The first 3 characters of the record Id will differ for different environments/ORGs)

iv. Click on the gear icon again at the top-right corner of Elements home page and click on Elements Configuration widget.

v. Go to the Entity Reference object.

vi. Click on the New button present in the top right side of the list view.

vii. In the New Entity Reference window, paste the first 3 characters of the previously copied Investments record ID. Then select the value as Investments from the Object picklist field. Click on Save button.

vii. A new Entity Reference record detail page will be displayed for Investments object.
b. Add Entity Reference for Investment Opportunity
i. Click on the gear icon at the top-right corner of Elements home page and click on Elements Deals widget.

ii. Click on the Investment Opportunity tab and click any record from the list view.

iii. Copy the first 3 characters of the record ID from the record page URL present in the address bar
Here is an Investment Opportunity record ID in the Salesforce URL: a18
(Note: The first 3 characters of the record Id will differ for different environments/ORGs)

iv. Click on the gear icon again at the top-right corner of Elements home page and click on Elements Configuration widget.

v. Go to the Entity Reference object.

vi. Click on the New button present in the top right side of the list view.

vii. In the New Entity Reference window, paste the first 3 characters of the previously copied Investment Opportunity record ID. Then select the value as Investment Opportunity from the Object picklist field. Click on Save button.

viii. A new Entity Reference record detail page will be displayed for Investment Opportunity object.

14. Make Book Cost field as not required for Holding object (Mandatory)
a. Click on the gear icon at the top-right corner of Elements home page and select ‘Setup.'
b. Click on Object Manager tab.
c. In the Quick Find search bar on the right side of the screen, type the keyword as Outreach and click on the Holding object under the Label column.

d. Click on the Page Layouts menu item on the left side of the screen which will display the Holding page layouts.

e. From the menu window on the top, type the field name as “Book Cost” in the Quick Find search bar, then click on the same field label which is greyed out.

f. Locate the Book Cost field in the page layout and click on the small Properties button which appears on the right side of the field.

g. From the popup window, uncheck the Required option and click Ok. Then, click on the Save button at the top left corner of the page layout detail.

15. Page Layout additions to InTouch Service Level (Relationship) custom object (Mandatory)
a. Click on the gear icon at the top-right corner of Elements home page and select Setup.

b. Click on the Object Manager tab.

c. In the Quick Find search bar on the right side of the screen, type the keyword as InTouch Service Level and click on the InTouch Service Level (Relationship) object under the Label column.

d. Click on the Page Layouts menu item on the left side of the screen which will display the page layouts.

e. Click on Service Level (Relationship) Layout and select the Fields option on the left side of the menu options window.


f. From the menu window on the top, type the field name as “Custom Review Frequency” in the Quick Find search bar, then drag and drop the field in the Information section. Then, click on the Save button.

Congratulations! You have successfully configured the new Deals app! If you have any questions about this installation guide, please enter a support ticket here.

