

The Elements Service Team will provide support within Salesforce and Elements. If you or the team that manages your domain needs assistance, please work with your domain provider directly.
What Are DKIM Keys?
DKIM is Domain Key Identified Mail. DKIM Keys are a way to show a recipient, whether that be internal or external to your organization, that an email sent from another system is authorized as being allowed to be sent on behalf of your domain.
Why are DKIM Keys Important?
By default, all emails that are sent from Salesforce are sent through Salesforce servers and not through a client's Exchange server whether that be cloud based through Office 365 or on-premise. This means that the emails will appear to be coming from the User's email address but will in-fact be coming from a Salesforce address. In some cases, these emails may be labeled as spam, in others they may go to junk, and even worse they may be blocked or automatically bounce from a client's email compliance system.
This is why DKIM Keys are so important. Because they are used as a method to show the recipient's email server that the email is authorized as being sent by you, this means that it increases the chances of the email being delivered and more DMARC compliant. DMARC or Domain-based Message Authentication, Reporting, and Conformance is the system that is used by a receiving email server to confirm whether an email meets the standards that are required for an email to be delivered, with one of these being that the sender's email address matches where it came from.
How to Create a DKIM Key?
To create a DKIM Key, you need to start in your Elements organization.
Once you're logged in, go to Setup and search for DKIM Keys in the Quick Find and click DKIM Keys on the left-hand side

After this, you'll get to the DKIM Keys page where you'll click Create New Key

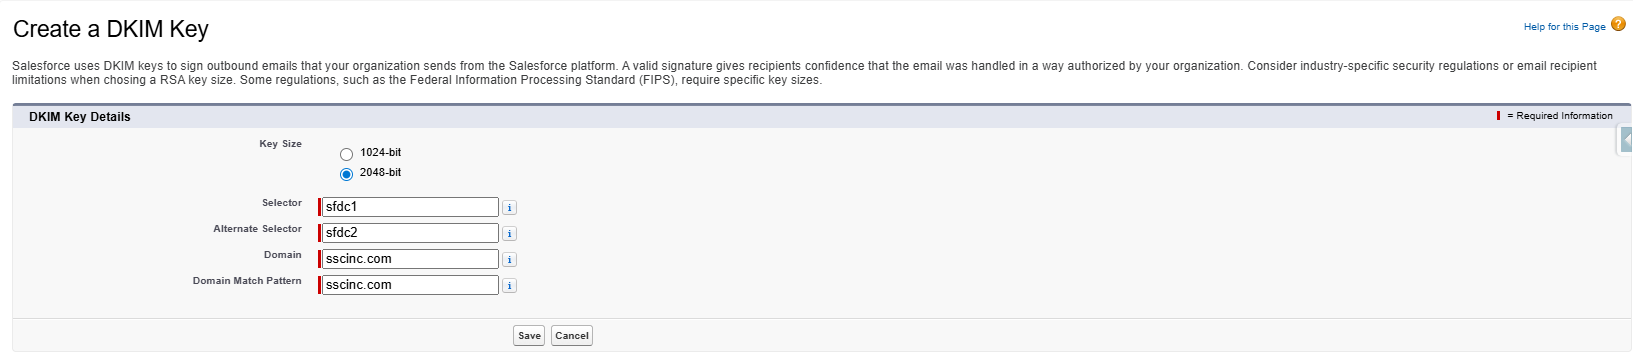
On the next page, you will need to fill in the specifics for the DKIM Key itself. The fields for these can be found in the screenshot below as well as information for each.

- Key Size: Key size determines how long the length of the key is. The size of the key is based on bits with a 1024-bit key being smaller and a 2048-bit key being larger. It is recommended to use 2048-bits.
- Selector: A selector is essentially a keyword that is used to identify the DKIM Key. You can technically make the selector anything that you'd like. An example is sfdc1 or dkim1.
- Alternate Selector: It is recommended to use multiple selectors, which allows for Salesforce to dynamically rotate between the selector and alternate selector. If the selector is sfdc1 or dkim1 then the alternate selector would be sfdc2 or dkim2.
- Domain: Domain is the email domain that this DKIM Key is for. In this example, we are doing this for SS&C as an example. We will need to check the email address to determine what domain will be used. In this case, the domain is sscinc.com so we input sscinc.com in the domain, which can be viewed below.
- Domain Match Pattern: This references whether this will be for an exact domain match, which in this case would only be emails sent from sscinc.com. However, if let's say that you had it setup where your emails were sent from a subdomain of the sscinc domain like let's say mail.sscinc.com then we would want to add the subdomain to the domain match pattern list. There may also be cases where you may send emails from both sscinc.com and mail.sscinc.com which would mean that we would want to include both. Please see below for examples.
-
DomainOnly: sscinc.com
-
SubdomainsOnly: mail.sscinc.com
-
DomainandSubdomains: sscinc.com, mail.sscinc.com
-

The screenshot below demonstrates what the DKIM Keys should look like once you're done.
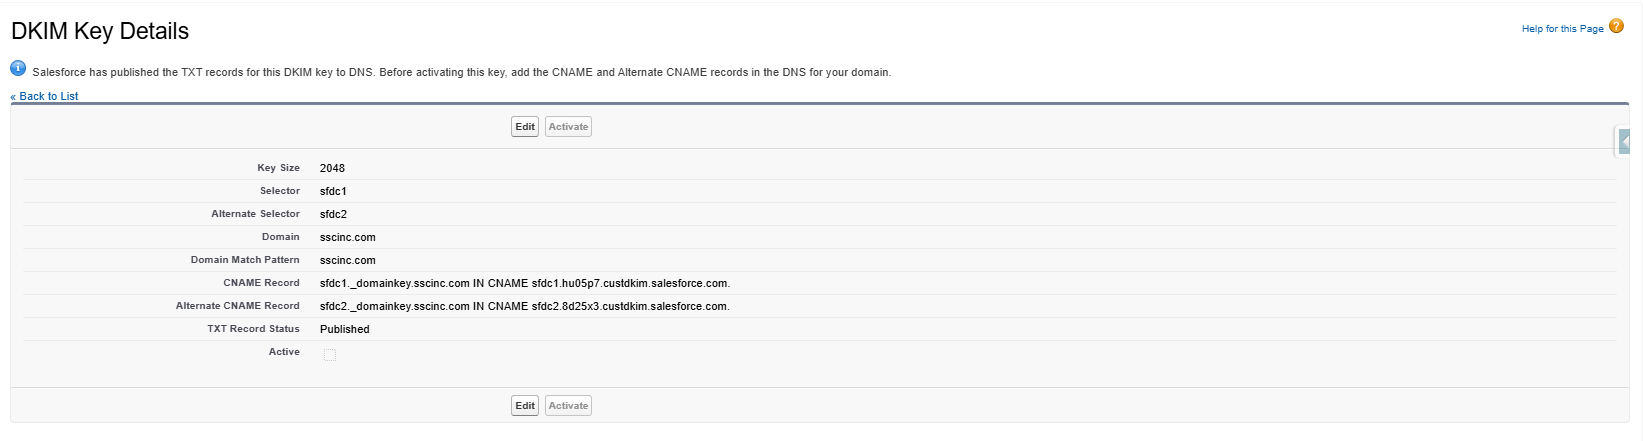
Once you hit Save on this page, the key will get created and corresponding TXT records will be published to their DNS (Domain Name System) and you will get to the following page.
Retrieving and Inputting CNAME Records in DNS
From the DKIM Key Details, you will be able to define the CNAME records. You will need to work with whoever manages your domain. This individual or organization would have access to the Domain Name System (DNS). The CNAME is what allows the receiving email server to determine which domain the email was sent from based on the IP Address of the sender.
CNAME 1
Name: sfdc1._domainkey.sscinc.com
TTL: Default
In CNAME: sfdc1.hu05p7.custdkim.salesforce.com
CNAME 2
sfdc2._domainkey.sscinc.com
TTL: Default
In CNAME: sfdc2.8d25x3.custdkim.salesforce.com
Below is an example of what this looks like once a client enters new CNAME records similar to those below in their DNS.

Activating the DKIM Keys
Once the client has entered the CNAME entries in their DNS similar to the screenshot above, you will need to activate the DKIM Keys. You typically need to provide as much as 24 hours for the CNAME records to be recognized in their DNS after they've been published.
To do so, you'll need to go back to the DKIM Keys page in setup and then click on the hyperlink for the Selector, which will allow you to enter the DKIM Key record in their Salesforce.

Once you do, you should see an Activate button that is now available to click. If you see that it is still greyed out then this could mean that the CNAME records were not published correctly. An example of this is that the IN CNAME was entered including the "." at the end and that carried over to the CNAME record itself. Below is an example of what this looked like.


An example of something that I've seen done incorrectly is that I have sent the IN CNAME including the "." at the end and the client's IT Team included the "." at the end which caused the CNAME record to not be read correctly. Below is an example of what this looked like.
Once the CNAME entries are correctly published in your DNS and the DKIM Keys are ready to be activated, the activate button on the DKIM Key Details page will no longer be greyed out and can be clicked to Activate the DKIM Keys.

