

This article includes links to and information from outside resources. We are not responsible for the content on the external site. If there is a link that does not work, please email [email protected] and we will attempt to adjust the information with an updated link.
We are excited to partner with Salesforce because their releases help you, too! The Winter '26 release for Salesforce is currently rolling out, and below are some of the key enhancements we want to highlight as your Salesforce partner.
The Release Date for Winter '26 will depend on the instance of Salesforce, but the main release weekends are on:
-
September 20, 2025
-
October 4, 2025
-
October 11, 2025
If you already know the instance your production Org is located on, you can head over to Trust Status, click on your instance name, and hit “Maintenance”. This will show you the date of the Salesforce Winter '26 release hitting your Org. If you don’t know your instance, go to Setup > Company Information.
Supported Browsers and Devices
General Setup
Complete Tasks More Efficiently with the New Setup Home Page
Spend less time in Setup and get things done more quickly with the revamped Setup Home page. In addition to your most recently used items, the new Setup Home offers recommended tasks and feature exploration through dedicated tiles. Also, the Setup sidebar is now available when you work in the Object Manager.
How: As part of the Setup Home redesign, the Create button was removed from the page. You can still create users, tabs, objects, email templates, and flows in the usual places in Setup and the Object Manager.
The new Setup Home page has limited support for branding and themes from Salesforce Lightning Design System (SLDS) 1. The background color of your Setup Home page is the lightest color of your SLDS 1 theme’s color palette. Background images aren’t supported.
The new Setup Home isn’t available in apps that have their own customized home page, such as Data Cloud and Service Cloud.
Leverage Enhanced Field History Tracking
Users can more easily prioritize which fields require tracking with an updated field history tracking user interface that includes data classification details across all objects. This new interface streamlines the audit and compliance process.
How: From Setup, in the Quick Find Box, enter Field History Tracking and select Field History Tracking.
Find the full list of updates here - General Setup
List Views
Sort List Views by Multiple Columns
To see your data in a more intuitive way and make your list views more actionable, you can now sort list views by up to 5 columns. Select the columns to sort by and whether to sort each column in ascending or descending order. To return to sorting by a single column, click a column header that isn’t included in your multiple-column sort. This feature, now generally available, includes some changes since the last release.
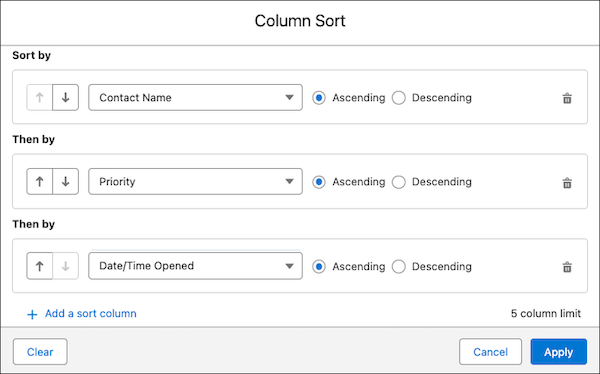
How: To sort a list view by multiple columns, from a list view, click the upward/downward arrow icon, and select the columns to include in the sort.
Configure sort by multiple columns
For example, create a Contacts list view that’s sorted by Contact Name, then by Relationship Name, and then by Last Review Date.
Your list sort configuration is saved until you modify or clear it. To return to the default sort order, click the gear and select Reset Column Sorting.
Speed Up List View Configuration with Type-Ahead Search
Skip the endless scroll through a list of fields and instead take a shortcut straight to the section of fields that you need. Now, when you edit or create a list view, you can click into the available fields or visible fields and type the first character of the field name that you want to find. Focus moves to the first field alphabetically that matches your typed character. Previously, type-ahead search wasn’t supported when you modified a list view’s fields.
How: From a list view, click the gear and select Select Fields to Display. To add a new field to the list view, click into the alphabetical Available Fields list. After you type a character into the list of fields, type the same character again to move focus down the list of available fields.
To select a field that’s in focus, press Ctrl+space. In this example, the Last Activity field is selected, and the Parent Account field is in focus.
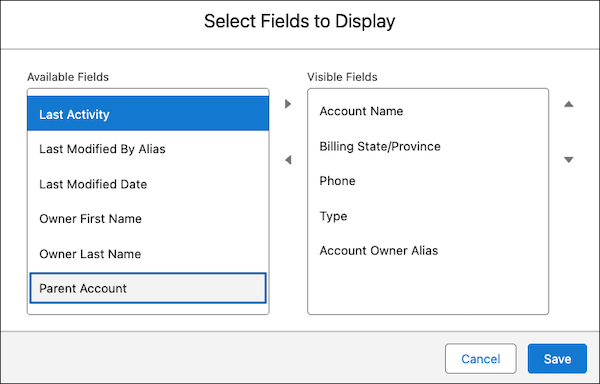
The Select Fields to Display window with one available field selected and one available field in focus
Type-ahead search works for all Salesforce-supported languages and characters. Type-ahead searches only on the first character that you type. If you type a second, different character, you jump to the section of fields that start with that second character.
Find the full list of updates here - List Views
Permissions and Sharing
Permission Set Licenses Are Removed After Unassigning Permission Sets and Permission Set Groups
Related permission set license assignments are now automatically removed after you unassign a permission set or permission set group from a user. This change makes license management more efficient, as manual removal was previously required. Automatic unassignment doesn’t occur when updates are made via user access policies, when the user requires the license through another permission set, when removing a licensed permission set from a permission set group, or when unassigning 50 or more permission sets or permission set groups at once.
Enable Secure Roles Behavior and Update Sharing Group References in Production
To prevent unintended access by external site users if you enable digital experiences, Salesforce now secures access to records. The default sharing group that’s available for roles and subordinates before you enable digital experiences is now displayed as Roles and Internal Subordinates instead of as Roles and Subordinates. To prepare for this change, update code and customizations that reference the old group name. Although Salesforce dynamically converts outdated references during a transition period, you must update all code and customizations to prevent errors. This update was first available in Summer ’25 and is enforced in Winter ’26.
When: This update was first available in Summer ’25 and is enforced in Winter ’26. To get the major release upgrade date for your instance, go to Trust Status, find your instance, and click the maintenance tab.
These changes were enforced in sandboxes in Summer ’25 through a separate release update.
Why: Previously, when you enabled digital experiences, records shared with Roles and Subordinates were made available by default to external site users. To secure access so that records were available only to internal users, it was necessary to use the Convert External User Access wizard and make manual updates. With this update, access to those records is limited to internal users by default.
How: Use this release update to test these changes and implement any necessary fixes before the enforcement date. If your code and customizations still reference the Roles and Subordinates value after both the release update is enforced and Salesforce stops dynamically converting references, your users can experience issues.
If you previously enabled the sandbox version of this release update in your production org using the test run, no further action is required.
Find the full list of updates here - Permissions and Sharing
Reports and Dashboards
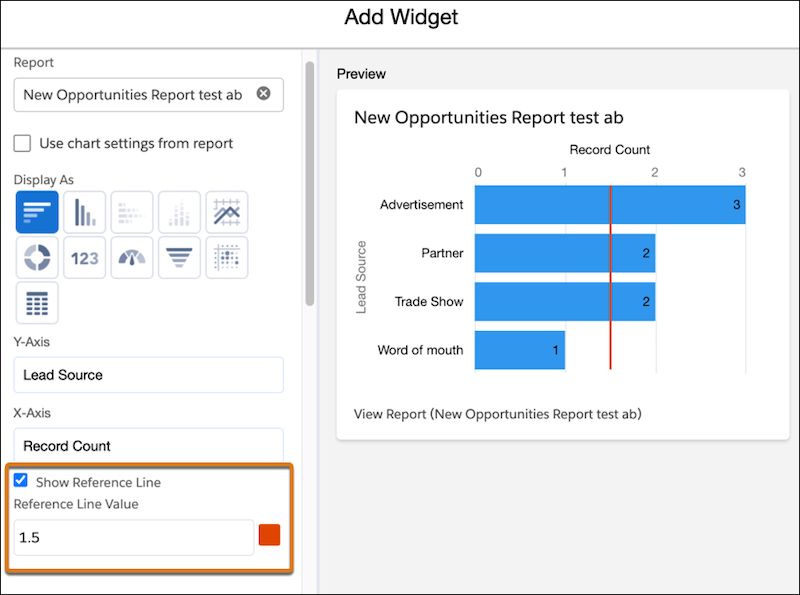
Interpret Data Easily with Reference Lines in Lightning Dashboard Charts
Identify trends, outliers, and areas that require attention by adding reference lines to your Lightning dashboard charts. Previously, you could add reference lines only to report charts. For example, a sales manager adds a sales target reference line to a monthly sales bar chart to quickly evaluate performance. This helps sales managers make faster, data-driven decisions.
How: Select Show Reference Line and enter the reference value when adding a chart widget to your dashboard.
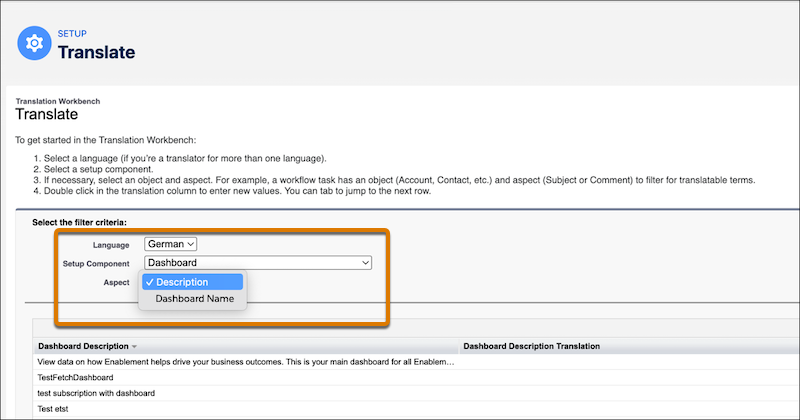
Enable Translations for Reports and Dashboards Metadata Labels
Localize your reports and dashboards by enabling translations for report metadata labels such as Description and Report Name. For dashboards and dashboard widgets, you can update translations for metadata labels such as Dashboard Name, Description, Widget Title, Widget Subtitle, and Widget Footer. This allows non-English-speaking users to view the fields in their locale’s language and improves their overall experience.
How: To translate metadata labels, enable Translation Workbench, select the languages for translation, and assign translators for each language.
Then, in Setup, in the Quick Find box, enter Translate and select Translate. Select the language for translation and select Dashboard, Dashboard Component, or Report as the setup component. From the Aspect dropdown, select the metadata label that you want to translate.
Find the full list of updates here - Reports and Dashboards
Outlook Integration
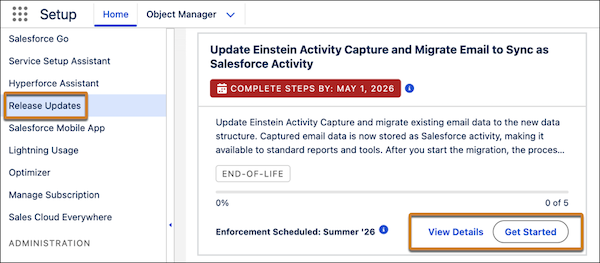
Update Einstein Activity Capture and Migrate Email to Sync as Activity
Update Einstein Activity Capture and migrate existing email data to the new data structure. Captured email data is now stored as Salesforce activity, making it available to standard reports and tools. After you start the migration, the process runs and completes automatically. This update is available starting in Winter ’26 and enforced in Summer ’26.
When: Salesforce enforces this update in Summer ’26. To get the major release upgrade date for your instance, go to Trust Status, search for your instance, and click the maintenance tab.
Why: Einstein Activity Capture now syncs and stores email data as task and email message records, integrating it with your other Salesforce data. Activity 360 Reporting, Activity Metrics, and the Activities Analytics Dashboard are being retired.
How: To review this update, from Setup, in the Quick Find box, enter Release Updates, and then select Release Updates. Einstein Activity Capture requires the new data structure after Summer ’26. If you don’t opt in by starting the migration process before the enforcement date, Salesforce turns on Sync Email as Salesforce Activity with the default settings and migrates previously captured email based on your data retention window.
Find the full list of updates here - Email Integration Updates
Flow Builder
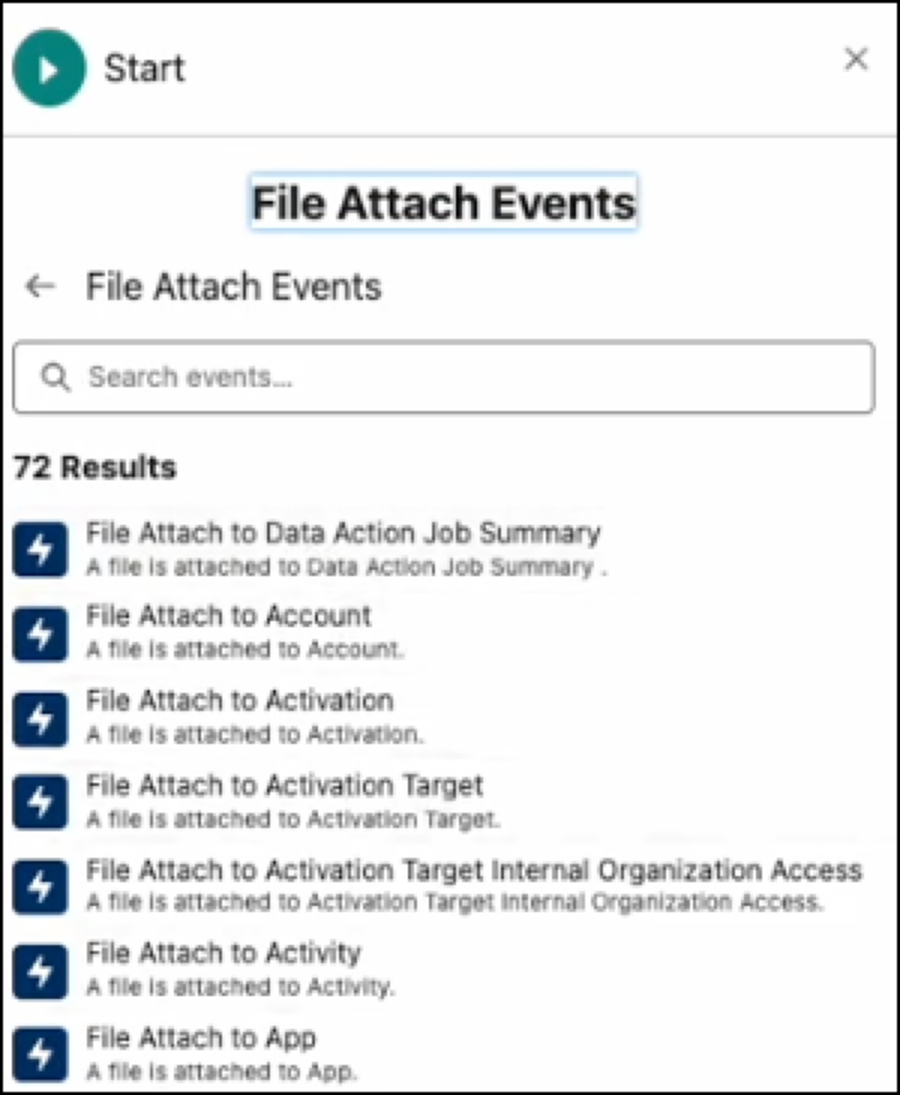
Trigger a Flow When a File Is Attached to a Record
Trigger a flow based on a specific file type or extension, matching file names, or the value in the Created By field. The Automation Event-Triggered Flow type with the File Attach event triggers a flow automatically when a file that matches the criteria is attached to a record.
How: Create a flow using the Automation Event-Triggered Flow type. In the Start node, click Select Event to access the Event Library. Select File Attach and select an available File Attach event.
File Attach Events
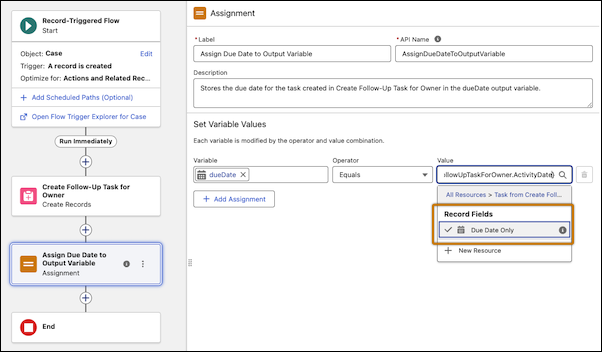
Add Newly Created Records Immediately to a Flow
Save time and simplify flow creation when building flows that create records. Now, you can immediately use fields from a newly created record in your flow without adding a Get Records element. This change enables more dynamic and responsive flows.
How: In Flow Builder, add a Create Records element to your flow. Then reference the created records in subsequent elements.
For example, you have a flow that automates task creation for a new high-priority case. Use the Create Records element to generate a follow-up task for the case owner. Then use the automatic output from the Create Records element to assign the task’s due date to an output variable.
Assigning an element to a record-triggered flow.
For flows created with API version 64 and earlier, references of a Create Record element are returned as string. When you save the flow with API version 65 and later, the flow fails because references are returned as field IDs. For seamless experience, change all references of the created records to their ID fields, and then save the flow.
Find the full list of updates here - Flow Builder Updates
Flow Debugging
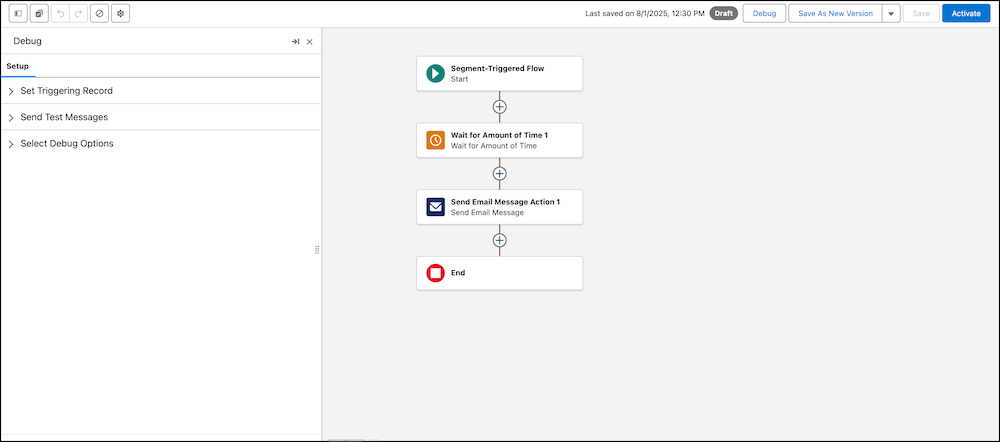
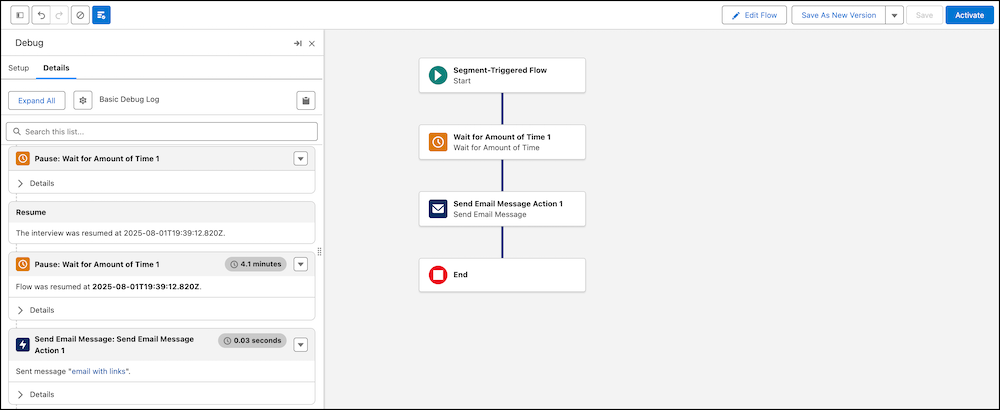
Debug and Fix Your Flows More Effectively
In the more efficient and precise Flow Builder debug experience, debug setup now opens in a resizable side panel that you can minimize and maximize. After a debug run, results appear as cards in the side panel. Use the result card’s dropdown menu to go directly to the relevant element in your flow. Seeing debug results, the flow canvas, and element properties in one place makes it easier to set up, understand, and act on the results of a debug run.
Why: The new debug setup side panel replaces the debug setup window that had limited workspace visibility. Now you can debug flows more efficiently and have more actionable visibility into execution.
How: To open the debug setup panel from the flow canvas, select Debug. Enlarge the panel up to 80% width or fully collapse it. To see debug setup options, click the Setup tab in the side panel.
Debug setup settings in the side panel.
To see debugging inputs, click the Details tab. To go to the relevant element on your canvas, go to the dropdown menu () in the element's input card and select View on Canvas.
Find the full list of updates here - Flow Debugging
Flow Management
Use the Updated Default Flow Record Page Layout
Customize the updated default flow record page to create a standardized and predictable layout across all Lightning apps. This standardization makes it easier for users to find key information across their workflows. The Versions tab of the default Flow record page now lists versions of the selected flow, which were previously shown on the Related tab. Be aware that the updated default record page overwrites existing customizations. To customize the new default record pages, edit them in Lightning App Builder.
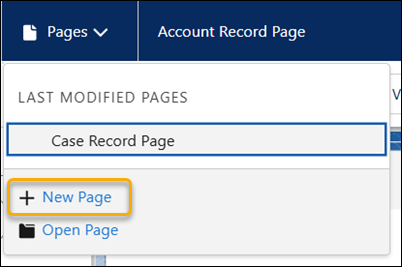
How: To customize a default record page, open Lightning App Builder, and create a record page.
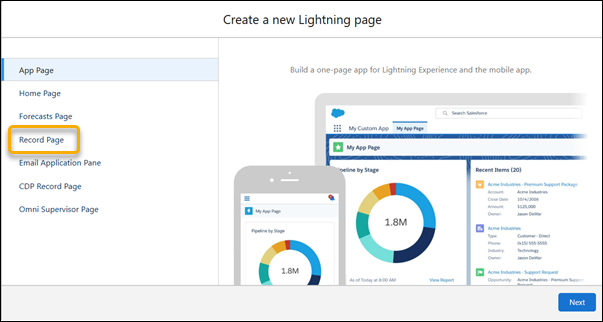
From the Create a new Lightning page window, select Record Page, and then click Next.
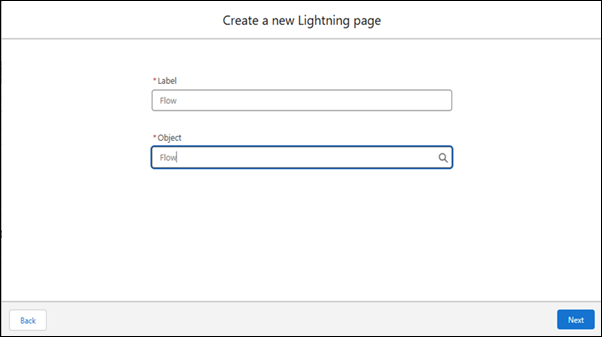
Enter the label for the new record page. For Object, select Flow, and then click Next.
Click the CLONE SALESFORCE DEFAULT PAGE tab, select Flow Page Default, and then click Done.
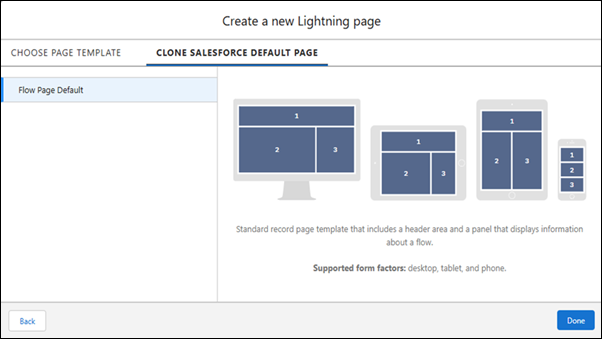
Add, move, or remove components from the default record page, and save your changes.
Compare Flow Versions to Track Changes More Efficiently
Pinpoint changes between any two flow versions of the same flow definition in Flow Builder. Avoid issues with changes to complex flows before they go live, or track change history faster. Previously, you compared flow versions manually or even sifted through hard-to-read XML files. You can compare flow versions in autolaunched, scheduled-triggered, platform event-triggered, and record-triggered flows.
How: From the Automation app, you can compare flow versions from the Flows list view or the flow’s details page. From the Flows list view, click the flow’s actions, and then click Compare Versions.
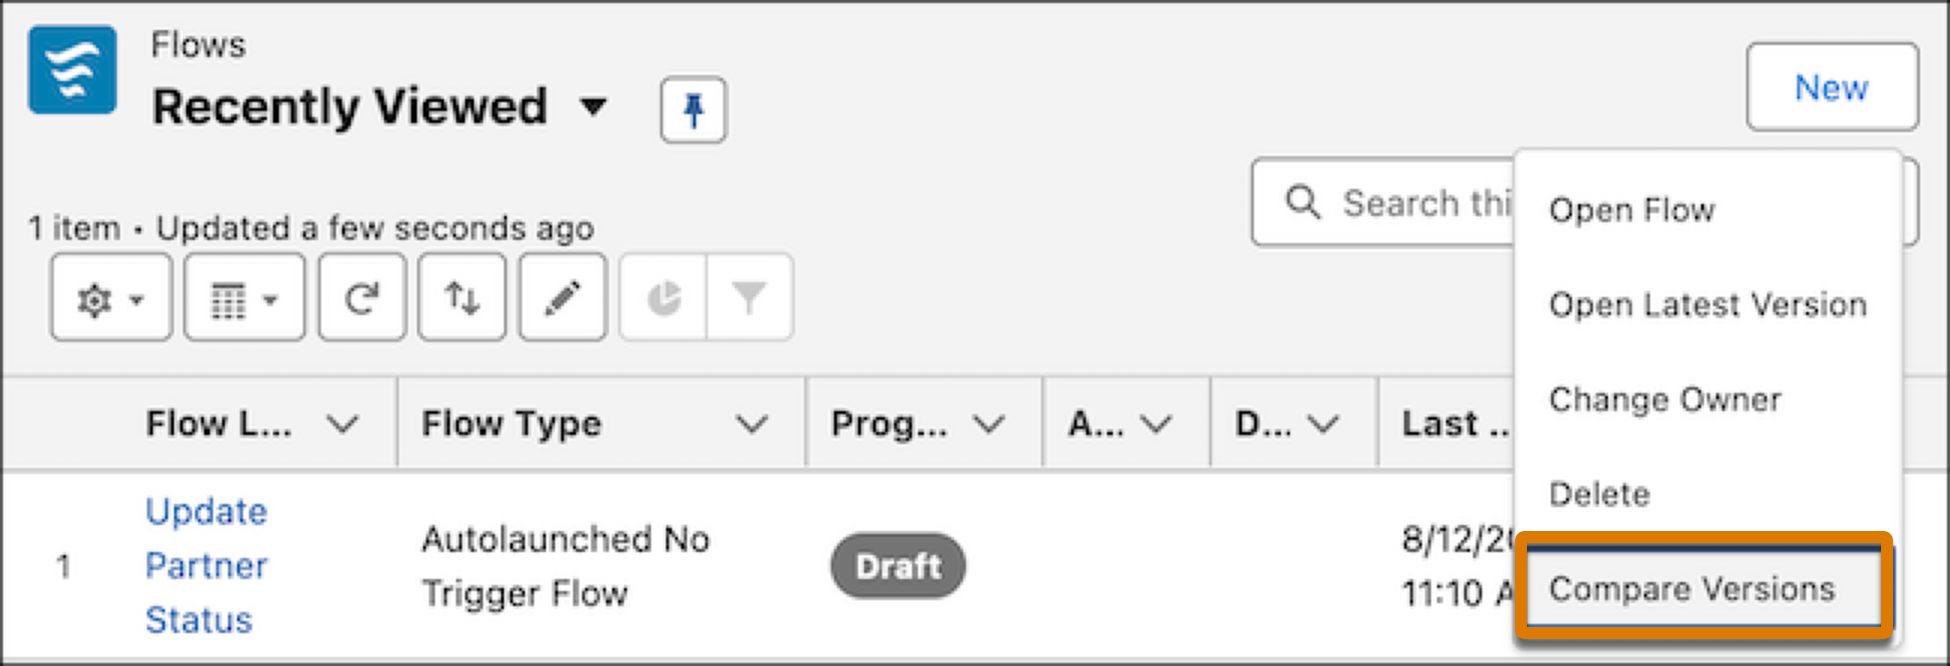
From the flow’s details page, click the flow’s actions, and then click Compare Versions.

Select another flow version to compare the two flow versions, and then click Compare Versions. You can change either flow version to compare. The comparison results show the changes made relative to the target version. In this example, Version 1 is the base version and Version 2 (Latest) is the target version. The comparison results show information such as the total number of each change type and API names of elements and resources.
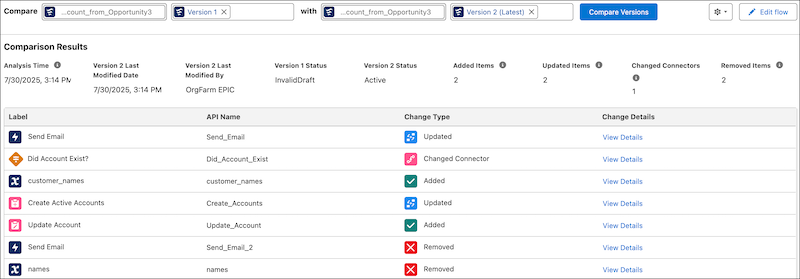
For more information about changes to an element or resource, click View Details. For example, the Create Records element label was changed from Create Accounts in Version 1 to Create Active Accounts in Version 2. The Update Existing Records option was changed from False in Version 1 to True in Version 2.

You can share URLs to flow comparison results or use them to access specific comparisons.
Find the full list of updates here - Flow Management
Supported Browsers and Devices for Lightning Experience
Consider these browser restrictions when working with Lightning Experience.
- Salesforce doesn’t support nonbrowser applications that embed WebView or similar controls to render content for Lightning Experience. Examples of approaches that embed this type of control include Salesforce Mobile SDK, Microsoft’s WebBrowser Control, Electron’s embedded Chromium browser, iOS’s UIWebView and WKWebView, and Android’s WebView.
- Lightning Experience doesn’t support incognito or other private browsing modes.
See the supported browsers and devices for Lightning Experience
Desktop and Laptop Browsers
Salesforce supports these browsers. Make sure that your browsers are up to date. Other browsers or older versions of supported browsers aren’t guaranteed to support all features.
|
|
MICROSOFT EDGE (NON-CHROMIUM) |
|
|
|
APPLE SAFARI | |
|---|---|---|---|---|---|---|
|
Lightning Experience |
Not supported |
Not supported |
Supports latest stable browser version. Internet Explorer mode for Microsoft Edge Chromium isn’t supported. |
Supports latest stable browser version |
Supports latest stable browser version |
Supports latest stable browser version |
|
Experience Builder sites |
Not supported |
Not supported |
Supports latest stable browser version. Internet Explorer mode for Microsoft Edge Chromium isn’t supported. |
Supports latest stable browser version |
Supports latest stable browser version |
Supports latest stable browser version |
|
Special setup considerations? |
Not supported |
Not supported |
No |
No |
No |
No |
|
Limitations? |
No |
Yes |
Tablet Browsers
Use Apple Safari on iPadOS (iOS 13.x or later). Lightning Experience on iPad Safari doesn’t support portrait orientation and orientation switching. Use landscape orientation, and maximize your Safari browser to full width. To prevent the tablet from switching orientation, turn on the iPad rotation lock.
|
APPLE® SAFARI® |
GOOGLE CHROME™ |
OTHER BROWSERS |
SALESFORCE MOBILE APP |
|
|---|---|---|---|---|
|
iPadOS |
Supported |
Not supported |
Not supported |
Supported |
|
Android |
— |
Not supported |
Not supported |
Supported |
Salesforce treats touch-enabled laptops, including Microsoft Surface and Surface Pro devices, as laptops instead of tablets. Users can’t access the Salesforce mobile app on these devices. Users are redirected to the full site experience that’s enabled for them—Lightning Experience or Salesforce Classic. Only standard keyboard and mouse inputs are supported on these types of devices.
Phones
For the best experience, use the Salesforce mobile app.
Third-Party Browser Extensions and JavaScript Libraries
Before using a third-party browser extension or JavaScript library, Salesforce recommends that users check AppExchange for browser extensions and apps from Salesforce partners or the Component Reference for base components that match requirements.
Although some third-party browser extensions can personalize and enhance the Salesforce experience, it is not recommended to use browser extensions that manipulate the DOM. Using third-party browser extensions is at the user’s risk. Salesforce can’t prevent these extensions from accessing user’s Salesforce data, nor can it detect that there’s any attempt to access data. Additionally:
- Browser extensions that insert or remove elements in the DOM can interfere with the stability of Lightning Experience and lead to unexpected behavior.
- Browser extensions that don’t follow Salesforce security standards can fail to work properly in Lightning Experience.
- The internal DOM structure of Lightning Experience can change in a future release, and compatibility with a third-party browser extension isn’t guaranteed.
To use a third-party JavaScript library with custom Lightning components, upload it first as a static resource. Use the JavaScript library by loading it in the component depending on which model that you’re using.
- Lightning Web Components: Load a third-party JavaScript library via lightning/platformResourceLoader
- Aura Components: Load a third-party JavaScript library via ltng/require
Add the New Setup Domain
Ensure that Setup pages in Lightning Experience load content correctly when browsers block third-party cookies. If your users have general access to the internet, no action is required. If your company controls users’ or servers’ access to the internet through firewalls or allowlists, your IT department must add *.salesforce-setup.com to the company’s list of allowed domains. Salesforce Setup pages are now hosted on that domain.
When: We’re using a staggered rollout to move the Setup pages to the *.salesforce-setup.com domain. The rollout began in Spring ’24 and continued through Spring ’25. As of Summer ’25, the change is enabled in all sandboxes and nonproduction orgs. The rollout is paused in Summer ’25 and resumes for production orgs in Winter ’26 according to the major release upgrade date for your instance.

