

This article includes links to and information from outside resources. We are not responsible for the content on the external site. If there is a link that does not work, please email [email protected] and we will attempt to adjust the information with an updated link.
We are so excited to partner with Salesforce because their releases help you, too! The Summer '24 release for Salesforce is rolling out, and below are some of the key enhancements we want to highlight as your Salesforce partner.
The Release Date for Summer '24 will depend on the instance of Salesforce, but the main release weekends are on:
-
May 17, 2024
-
June 07, 2024
-
June 14, 2024
If you already know the instance your production Org is located on, you can head over to Trust Status, click on your instance name, and click Maintenance. This will show you the date of the Salesforce Summer '24 release coming to your Org. If you don’t know your instance, the quickest way to find out is to head to Company Information within Setup in Elements.
General Setup
Add New Custom Fields to Dynamic Forms-Enabled Pages
Users can quickly and easily add a new custom field to their respective Dynamic Forms-enabled pages by using a new step in the custom-field creation wizard.
Where: This change applies to Lightning Experience in Group, Professional, Enterprise, Performance, Unlimited, and Developer editions.
How: Create a custom field as usual in Setup. After setting field-level security, you see the new step to select which Lightning record pages to add the field to.

The new field is added to each record page you select as the last field in the first field section on the page.
If there aren't any Dynamic Forms-enabled pages for the object for which the field is being created, then the new step doesn't appear.
Enforce View Roles and Role Hierarchy Permission When Editing Public List View Visibility
With this update, only users with the View Roles and Role Hierarchy permission can see or select from your organization’s list of roles when they edit public list view visibility. This update was first available in Spring ’24. If your organization doesn’t use roles, this update has no impact.
Where: This change applies to Lightning Experience and Salesforce Classic in Enterprise, Performance, Unlimited, and Developer editions.
When: Salesforce enforces this update in Winter ’25. To get the major release upgrade date for your instance, go to Trust Status, search for your instance, and click the maintenance tab.
Why: This security update blocks users with only the Manage Public List Views permission from seeing roles and role hierarchies when they edit public list views.
How: To edit public list views, a user needs the Manage Public List Views permission. After you enable this update, so that users can make list views visible to roles, grant them the View Roles and Role Hierarchy permission as well. Alternatively, have a user who already has the View Roles and Role Hierarchy permission grant access to list views. A user with only the Manage Public List Views permission can still make a list view visible to Public Groups or set a list view to fully public or private.
To view this update, from Setup, in the Quick Find box, enter Release Updates, and then select Release Updates. For Enforce View Roles and Role Hierarchy Permission When Editing Public List View Visibility, follow the testing and activation steps.
Get Better Performance for List Views
To improve performance and meet the latest accessibility standards, list views for custom objects now render with Lightning Web Components (LWC) instead of Aura. LWC, Salesforce’s newest framework, delivers your data faster and makes the latest features available for your list views. List views for standard objects, such as accounts, still render with Aura.
Where: This change applies to Lightning Experience in all editions.
How: List view pages for custom objects include these minor changes, but the overall way that your users work in list views hasn’t changed.
-
The List Views dropdown menu displays up to 100 lists and shows Recent List Views and the option to search your lists at the top of the dropdown. If you have more than 100 list views, use search terms to find a specific list.
-
Keyboard navigation for the List Views dropdown menu starts with focus at the top of the list rather than on the currently pinned list.
-
Some icons and highlights, such as the check mark next to a selected list in the List Views dropdown menu and the
 icon, have updated colors. Additionally, the color, size, alignment, and capitalization of some windows, buttons, and dropdown menus have changed.
 -
The Filters panel has new button options in the add or edit filters work flows. Cancel to exit the add or edit filter flow, and Save to apply your changes. You can still click outside of the panel or press the Escape key to close the panel. When you add or edit a filter, the Value menu closes each time you select an option from it. Options appear below the Value menu as you select them. To remove an existing filter, click the
 icon.
icon. -
When you edit filter logic, the Cancel and Save buttons don’t appear in the Filters panel until you click outside of the Filter Logic text field. Your filter logic is checked for errors when you save your changes.
-
When you create a filter that uses a location-based field, the values that you select initially show as the full location name in the Filters panel. After you save your changes, the values convert to an abbreviated form, such as CA for California or NV for Nevada.
-
After you add a filter, keyboard focus returns to the Add Filter button. After you edit a filter, keyboard focus returns to the edited filter.
-
Header icons in columns and fields don’t render.
-
Some errors and in-app messages appear in updated locations or formats and with new language.
For example, after a save, a field-level error previously appeared directly below the affected input field. Now, a field-level error appears to the left of the row and includes the affected field's name.
Some errors occur before you save. With this type of error, the error message appears below the input field in the edit panel, and the field reverts to its original value if you close the panel before fixing the issue.
See Dynamic Forms-Enabled Lightning Page Information for Custom Fields
You can now successfully view the Lightning page information for custom fields in use on Dynamic Forms-enabled pages via the Where is this used? button. In the Where is this used? list, a link to a Lightning page associated with a FlexipageFieldInstance reference type correctly routes you to the details for that page. Previously, clicking a Lightning page link for a FlexipageFieldInstance reference type resulted in an error.
Where: This change applies to Lightning Experience in Group, Professional, Enterprise, Performance, Unlimited, and Developer editions.
How: From Setup, select Object Manager | Object Name | Fields & Relationships. Click the name of a custom field used on a Lightning page that uses Dynamic Forms, and then click Where is this used?.

Find the full list of updates here - General Setup
Lightning App Builder
Use Blank Spaces to Align Fields on Dynamic Forms-Enabled Pages
Customize field alignment in Dynamic Forms field sections with the new Blank Space component. Find it on the Fields tab when viewing Dynamic Forms-enabled Lightning record pages in the Lightning App Builder. You can use a blank space on its own to separate fields vertically inside a field section. To further enhance the alignment of your field section content, you can also use a blank space in conjunction with the field section property Align fields horizontally. We delivered this feature thanks to your ideas on IdeaExchange.
Where: This change applies to Lightning Experience in Group, Professional, Enterprise, Performance, Unlimited, and Developer editions.
How: For example, these two versions of the same field section contain account fields, with a blank space added below the Phone field. The left image shows the default behavior without Align fields horizontally selected. The blank space appears with a single row height.
On the right, the horizontal alignment setting was selected, causing the Website field to stay aligned horizontally with Parent Account instead of collapsing upward. The blank space height is now expanded to align with the row height of its neighbor, Billing Address.

A blank space component is considered a field and counts against the limit of 100 fields per region. It doesn’t count against the component page limit.
Set Conditional Visibility for Individual Tabs in Lightning App Builder
Customize tab visibility in the Lightning App Builder according to your business needs. You can set the conditions to dynamically show or hide an individual tab in the Tabs component. This change applies to tabs on LWC-enabled record pages.

Where: This change applies to Lightning Experience in Professional, Enterprise, Unlimited, Pro Suite, and Developer editions.
How: For a complete list of LWC-enabled objects, see LWC Migration for Record Home Pages.
See Fields in Compact Density When Configuring a Lightning Record Page
The Compact density setting is now respected in Lightning App Builder preview on Dynamic Forms-enabled pages. When Compact mode is enabled, the height of fields in field sections is shorter.
Where: This change applies to Lightning Experience in Group, Professional, Enterprise, Performance, Unlimited, and Developer editions.
Find the full list of App Builder updates here - App Builder
Permissions
Get a Summary of a User’s Permissions and Access
If you've wondered what permissions, public groups, or queues a user is assigned, you're in luck. With the User Access Summary you can see this information directly from the user’s detail page, saving you time, clicks, and effort. There’s no need to run queries or look through each profile, permission set, public group, or queue when troubleshooting or managing access.
Where: This change applies to Lightning Experience and Salesforce Classic (not available in all orgs) in all editions.
How: From Setup, in the Quick Find box, enter Users, and then select Users. Select a user, and then click View Summary.

See What’s Enabled in Permission Sets and Permission Set Groups
It can be tricky to track all the permissions included in your permission sets and permission set groups. To make managing your users’ access easier, you can now see all enabled object, user, field, and custom permissions on one page. You can also see which permission set groups include the permission set and vice versa. This feature, now generally available, includes some changes since the beta release. The summary page has an improved interface, and we added the ability to see included custom permissions and permission sets in permission set groups.
Where: This change applies to Lightning Experience and Salesforce Classic (not available in all orgs) in all editions.
How: From Setup, in the Quick Find box, enter Permission Sets, and then select Permission Sets. Or, enter Permission Set Groups, and then select Permission Set Groups. Select a permission set or permission set group, and then click View Summary.

Allow Users to Freeze Users and Monitor Login History Without the Manage Users Permission
You can now grant the ability to freeze and unfreeze users by using the Freeze Users permission. You can also allow users to view and download login history with the Monitor Login History permission. With this permission, a user can access the login history related list on user records and view data in Login History reports with relevant report permissions. Previously, you assigned the Manage Users permission to enable these features for users, but it includes additional capabilities. For users currently assigned the Manage Users permission, the Freeze Users and Monitor Login History permissions are enabled automatically.
Where: This change applies to Lightning Experience and Salesforce Classic (not available in all orgs) in Professional, Enterprise, Performance, Unlimited, and Developer editions.
How: To assign these new permissions, add them to a permission set, and then assign the permission set to users who require these permissions.
Find the full list of Permissions updates here - Permissions
Flow Builder
Check for Duplicates Before Creating Records in a Flow
To prevent duplicate records, check for records that match a set of criteria in the Create Records element. Also specify whether to skip or update matching records. If you choose to skip matching records, the flow doesn’t create or modify any records. If you choose to update matching records, the flow modifies the records with the values that you provide. Some field-level configurations and validations in your org override the settings in the Create Records element.
Where: This change applies to Lightning Experience and Salesforce Classic in Essentials, Professional, Enterprise, Performance, Unlimited, and Developer editions.
How: In Flow Builder, create a flow that includes a Create Records element. In the Create Records pane, enable Check for Matching Records. Add one or more conditions. Select whether to update or skip matching records. Save the flow.

Configure Conditions More Easily with Is Blank and Is Empty Operators in Flows
Use the Is Blank operator in a condition to check whether a text value contains no characters or only white space. For data type values other than text values, the Is Blank operator checks whether values are null. Previously, you used the Equals operator and the Blank Value (Empty String) global constant. To check whether a collection is empty, use the Is Empty operator. Previously, you added the Assignment and Decision elements to check the collection size.
Where: This change applies to Lightning Experience in Essentials, Professional, Enterprise, Performance, Unlimited, and Developer editions.
How: Add one of these elements to your flow: Decision, Wait for Conditions, or Collection Filter. To configure a condition in the element, enter a resource that references a value. Select the Is Blank operator. Enter a resource that references a collection. And then select the Is Empty operator.

Find the Type of Automation to Build with Ease
Now it’s easier to find the type of flow or orchestration you want to build. Instead of scrolling through all types and templates in one window, you’re prompted to decide whether you want to start from scratch or use a template. The next window shows only relevant information, based on what you selected on the previous window. For example, if you select the option to use a template, the next window lists only templates. Also, you can now search for templates.
Where: This change applies to Lightning Experience and Salesforce Classic in Essentials, Professional, Enterprise, Unlimited, and Developer editions.
How: From the Flows section in Setup, click New Flow, or from the Automation Lightning app, click New. Select the type of automation you want to build, then click Next.

If the selected automation type is Start From Scratch, the next window shows flows and orchestrations.

If the selected automation type is Use a Template, the next window shows templates. Search for your template to find it faster.

View Your Elements by Label in the Flow Builder Toolbox
Elements are now listed in the Flow Builder toolbox by their label instead of by their API name. This change unifies the label-first user experience across Flow Builder. You can view the API name by hovering over a tooltip next to the element. You can now search for an element by its label or by its API name.
Where: This change applies to Lightning Experience and Salesforce Classic in Essentials, Professional, Enterprise, Unlimited, and Developer editions.
How: From the Flow Builder canvas in Auto-Layout, click Toolbox and scroll down to view your element. Hover over the tooltip icon to see the element’s description, API name, and label.

From the Flow Builder canvas in Free-Form, click Toolbox, then click Manager. Scroll down to view your element. Hover over the tooltip icon to see the element’s description, API name, and label.

Build Flows More Easily with Auto-Generated Element Names
Now when you add an element to your flow while in Auto-Layout mode, a value in the Label is generated automatically. We also select that label so you can easily edit the generated value. This change applies to all elements except Screens. For Decision and Wait elements, paths are also named automatically. We also updated the panel headings to be consistent across elements when editing.
Where: This change applies to Lightning Experience and Salesforce Classic in Essentials, Professional, Enterprise, Unlimited, and Developer editions.
Why: To streamline the process of naming elements, we pre-populate the Label field to ensure that names are consistent and unique across your flow.
How: From the canvas in Auto-Layout mode, add an element to your flow. The Label is automatically generated and selected.

Transform Your Data in Flows
Modify your data into the shape that fits your business process with the new Transform element in Flow Builder. Now generally available, the Transform element includes some changes since the last release. Mapping tips help you avoid errors before you save your flow. Previously, you received errors for the Transform element only when you saved the flow. Also, you can use your keyboard and screen reader to navigate the Transform element more easily. Previously, you couldn’t navigate source or target data or hear descriptions about mappings.
Where: This change applies to Lightning Experience and Salesforce Classic in Essentials, Professional, Enterprise, Performance, Unlimited, and Developer editions.
How: To view a mapping tip of a misconfiguration error, hover over the error icon ![]() shown next to a target data field or collection when you configure the Transform element in Flow Builder.
shown next to a target data field or collection when you configure the Transform element in Flow Builder.

To view a mapping tip next to a target field or collection that’s unavailable for mapping, hover over the space next to the target field or collection.

Find the full list of Flow Builder updates here - Flow Builder
Flow Management
Manage Your Flows More Efficiently with the Automation Lightning App
View and monitor your flows in the Automation Lightning app, which is now available to all flow admins and other users that you grant access to. From the app, you can create flows or open any flow that you have permission to access in Flow Builder. New list views show your most recently modified flows and flow definitions that include errors. Search for flows using a keyword in the flow label. Filter or sort flows by type, progress status, last modified date, last modifying user, and associated record fields. Additionally, find a direct link to the Trailblazer Community and to relevant learning material on Trailhead.
Where: This change applies to Lightning Experience and Salesforce Classic in Essentials, Professional, Enterprise, Unlimited, and Developer editions.
How: In the App Launcher, search for Automation and select the Automation app. If you don’t see the app, go to Process Automation Settings in Setup, and select Enable the Automation Lightning App.

Have Unlimited Paused and Waiting Flows
We’ve removed the per-org usage-based limit for paused and waiting flow interviews. While there’s no limit now for paused and waiting flow interviews, the number of paused and waiting flows can still be limited by the amount of storage available to your org. If you need more storage, call your Salesforce account rep.
Where: This change applies to Lightning Experience in Enterprise, Performance, Unlimited, and Developer editions.
Find the full list of Flow Management updates here - Flow Management
Flow Actions
Lock and Unlock Records with an Action
Use the Lock Record action in a flow’s Action element to lock or unlock a record and specify who can edit the record while it’s locked.
Where: This change applies to Lightning Experience, Salesforce Classic (not available in all orgs), and all versions of the mobile app in Essentials, Professional, Enterprise, Performance, Unlimited, and Developer editions.
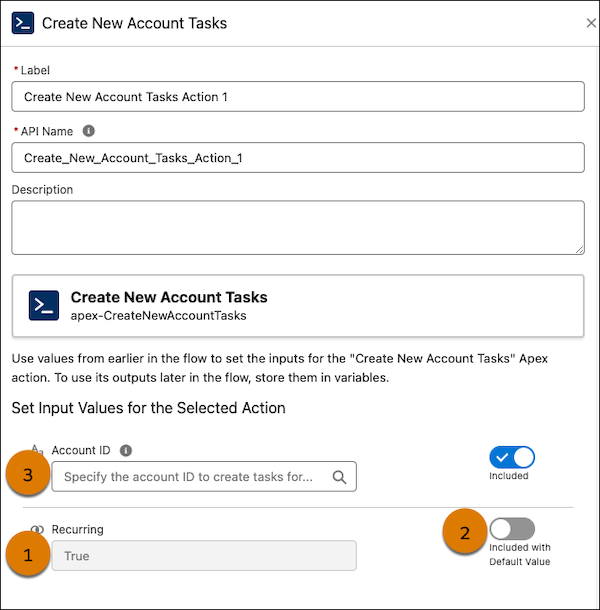
Use the New Toggle for Flow Action Inputs with Explicit Default Values
You can now see explicitly defined default values for flow action inputs. Use the Included with Default Value toggle value to see the explicitly defined default value that's sent to the action at run time. Or use the Included with Specified Value toggle value to instead specify a value for the input. You can also see custom guidance in inputs with defined placeholder text. This update doesn’t impact actions that were created or updated before Summer ’24.
Where: This change applies to Lightning Experience and Salesforce Classic in Performance, Unlimited, Developer, Enterprise, and Database.com editions.
How: Add an Action element to your flow. Select an action with an explicitly defined default value or custom placeholder text. See the explicitly defined default value (1). To specify a different value, toggle Included with Default Value (2) to Included with Specified Value. If the input has custom placeholder text, you can see it in the text box (3).
Find the full list of Flow Actions updates here - Flow Actions
Flow Orchestration
Configure Conditions More Easily with the Is Blank Operator in Orchestrations
You can now use the Is Blank operator in a condition to check whether a text value contains no characters or only white space. For values of data types other than text, the Is Blank operator checks whether the values are null. Previously, you used the Equals operator and the Blank Value (Empty String) global constant.
Where: This change applies to Lightning Experience in Enterprise, Performance, Unlimited, and Developer editions.
How: Add a Stage element, a Decision element, or Step resource to your orchestration. To determine whether a text resource references an empty string, configure a condition with a resource that can contain a string. Then select the Is Blank operator.
![]()
Suspend and Resume an Orchestration
Users can suspend a running orchestration, and when the customer has updated their documentation, you can resume the orchestration.
Where: This change applies to Lightning Experience in Enterprise, Performance, Unlimited, and Developer editions.
Who: Users with the Manage Orchestration Runs user permission or the Manage Orchestration Runs and Work Items user permission.
How: To suspend an orchestration run, from the Orchestration Runs list view, locate the orchestration run you want to suspend, and, from its Quick Action menu, select Suspend Run. To resume a suspended orchestration run, from the Orchestration Runs list view, locate the suspended orchestration run you want to resume, and, from its Quick Action menu, select Resume Run.
Resume a Failed Orchestration
Your orchestration ran for 3 weeks and then failed. Did it fail because a flow or action called by a step failed? If it did and the orchestration run failed within the last 14 days, you can now fix the error and resume the orchestration run.
Where: This change applies to Lightning Experience in Enterprise, Performance, Unlimited, and Developer editions.
Who: Users with the Manage Orchestration Runs user permission or the Manage Orchestration Runs and Work Items user permission.
How: To resume a failed orchestration run, from the Orchestration Runs list view, locate the orchestration run you want to resume, and, from its Quick Action menu, select Resume Run. Resume Run isn’t available for an orchestration run when its failure wasn’t due to a called flow or when action or the failure occurred more than 14 days in the past.
Find the full list of Flow Orchestrator updates here - Flow Orchestration
Supported Browsers and Devices for Lightning Experience
Consider these browser restrictions when working with Lightning Experience.
-
Salesforce doesn’t support nonbrowser applications that embed WebView or similar controls to render content for Lightning Experience. Examples of approaches that embed this type of control include Salesforce Mobile SDK, Microsoft’s WebBrowser Control, Electron’s embedded Chromium browser, iOS’s UIWebView and WKWebView, and Android’s WebView.
-
Lightning Experience doesn’t support incognito or other private browsing modes.
See the supported browsers and devices for Lightning Experience
Desktop and Laptop Browsers
Salesforce supports these browsers. Make sure that your browsers are up to date. Other browsers or older versions of supported browsers aren’t guaranteed to support all features.
|
|
|
MICROSOFT EDGE (NON-CHROMIUM) |
|
|
|
|
|---|---|---|---|---|---|---|
|
Lightning Experience |
Not supported |
Not supported |
Supports latest stable browser version. Internet Explorer mode for Microsoft Edge Chromium isn’t supported. |
Supports latest stable browser version |
Supports latest stable browser version |
Supports latest stable browser version |
|
Experience Builder sites |
Not supported |
Not supported |
Supports latest stable browser version. Internet Explorer mode for Microsoft Edge Chromium isn’t supported. |
Supports latest stable browser version |
Supports latest stable browser version |
Supports latest stable browser version |
|
Special setup considerations? |
Not supported |
Not supported |
No |
No |
No |
No |
|
Limitations? |
No |
Tablet Browsers
Use Apple Safari on iPadOS (iOS 13.x or later). . Lightning Experience on iPad Safari doesn’t support portrait orientation and orientation switching. Use landscape orientation, and maximize your Safari browser to full width. To prevent the tablet from switching orientation, turn on the iPad rotation lock.
|
|
APPLE® SAFARI® |
GOOGLE CHROME™ |
OTHER BROWSERS |
SALESFORCE MOBILE APP |
|---|---|---|---|---|
|
iPadOS |
Supported |
Not supported |
Not supported |
Supported |
|
Android |
— |
Not supported |
Not supported |
Supported |
Salesforce treats touch-enabled laptops, including Microsoft Surface and Surface Pro devices, as laptops instead of tablets. Users can’t access the Salesforce mobile app on these devices. Users are redirected to the full site experience that’s enabled for them—Lightning Experience or Salesforce Classic. Only standard keyboard and mouse inputs are supported on these types of devices.
Phones
For the best experience, use the Salesforce mobile app.
Third-Party Browser Extensions and JavaScript Libraries
Before using a third-party browser extension or JavaScript library, Salesforce recommends that users check AppExchange for browser extensions and apps from Salesforce partners or the Component Reference for base components that match requirements.
Although some third-party browser extensions can personalize and enhance the Salesforce experience, it is not recommended to use browser extensions that manipulate the DOM. Using third-party browser extensions is at the user’s risk. Salesforce can’t prevent these extensions from accessing user’s Salesforce data, nor can it detect that there’s any attempt to access data. Additionally:
-
Browser extensions that insert or remove elements in the DOM can interfere with the stability of Lightning Experience and lead to unexpected behavior.
-
Browser extensions that don’t follow Salesforce security standards can fail to work properly in Lightning Experience.
-
The internal DOM structure of Lightning Experience can change in a future release, and compatibility with a third-party browser extension isn’t guaranteed.
To use a third-party JavaScript library with custom Lightning components, upload it first as a static resource. Use the JavaScript library by loading it in the component depending on which model that you’re using.
-
Lightning Web Components: Load a third-party JavaScript library via
lightning/platformResourceLoader -
Aura Components: Load a third-party JavaScript library via
ltng/require
Supported Browsers and Devices for Salesforce Classic
Salesforce Classic doesn't support mobile browsers, so it is recommended to use the Salesforce mobile app for working on mobile devices.
Salesforce Classic is available in all editions.
|
|
|
MICROSOFT EDGE (NON-CHROMIUM) |
|
|
|
|
|---|---|---|---|---|---|---|
|
Salesforce Classic |
Not supported |
Supports latest stable browser version. Internet Explorer mode for Microsoft Edge Chromium isn’t supported. |
Supports latest stable browser version |
Supports latest stable browser version |
Supports latest stable browser version |
|
|
Salesforce Classic Console |
Not supported |
Supports latest stable browser version. Internet Explorer mode for Microsoft Edge Chromium isn’t supported. |
Supports latest stable browser version |
Supports latest stable browser version |
Not supported |
|
|
Special setup considerations? |
Not supported |
No |
No |
No |
||
|
Limitations? |
No |
No |
MFA Is Turned On by Default Starting April 2024
To prevent unauthorized access to Salesforce accounts, multi-factor authentication (MFA) is required when users log in. To help customers with this contractual requirement, Salesforce is making MFA a default part of the direct login process for production orgs. This change applies to production orgs created on or after April 8, 2024. It also applies to any existing production org that wasn’t included in one of the MFA auto-enablement phases that occurred between Spring ’23 and Spring ’24. Sandbox orgs aren’t affected. Orgs that are in a trial period aren’t affected until they’re converted to a subscription.
Where: This change applies to Lightning Experience, Salesforce Classic, and all Salesforce mobile apps in all editions.
When: This change goes into effect on April 8, 2024.
Why: On their own, usernames and passwords no longer provide sufficient protection against cyberattacks. MFA is one of the simplest, most effective ways to prevent unauthorized account access and safeguard your data and your customers’ data. Salesforce requires MFA to help protect against threats like phishing attacks, credential stuffing, and unauthorized account access. To learn more about the value of MFA and how it works, watch this short video.
How: When MFA is turned on for an org, users must verify their identity with a username and password, followed by a separate verification method. Verification method options include authenticator apps, security keys, and built-in authenticators. The first time each user logs in to their org, they’re guided through the steps to register a method.
There’s a 30-day grace period for the org during which users can log in without MFA if they’re not ready to set up a verification method. If needed, a Salesforce admin can temporarily turn off MFA by deselecting the Require multi-factor authentication (MFA) for all direct UI logins to your Salesforce org setting on the Identity Verification page in Setup. But keep in mind that MFA is contractually required, so re-enable it as soon as possible.
Salesforce for Outlook Is Being Retired in June 2024
Full product retirement for Salesforce for Outlook is scheduled for June 2024. For the latest integration with Microsoft Outlook, we recommend moving to our next-generation products, the Outlook integration and Einstein Activity Capture. These products replace Salesforce for Outlook features and give users new capabilities. We continue to introduce enhancements for these products every release.
Where: This change applies to Lightning Experience and Salesforce Classic in Contact Manager, Group, Essentials, Professional, Enterprise, Performance, Unlimited, and Developer editions.
How: When Salesforce for Outlook is retired, it will no longer sync contacts, events, or tasks. Admins and users also lose access to Salesforce for Outlook features, such as the side panel.

